Local Camps
- Details
- Hits: 867
From http://ammo.com/articles/surviving-in-the-wild
Wilderness Survival Guide: How To Stay Alive if Lost, Hurt or Stranded
Imagine a fun afternoon hike around Mt. Baker. You're enjoying the quiet of the forest, the dappled light shining through the trees, and the intoxicating smell of the leaves when thick fog rolls in unexpectedly at 4:00 p.m. In a panic, you follow the wrong trail for hours along a progressively steeper face until you've run out of daylight.
Imagine being on a snowmobile in the back-country with friends, zipping through the powder and chasing each other between the tree trunks when a blizzard sets in and the last snowmobile doesn’t show up at the rendezvous point.
Or imagine the mountain biking trip you’ve been daydreaming about for months, bombing down the mountain with the wind in your face. You get separated from your group on a tricky portion of singletrack, and decide to press on when you come to an unknown fork in the trail. Feeling exhausted and dehydrated, you take a corner too fast and crash, taco–ing your front wheel and breaking your collar bone.
Lost, hurt, stranded – these scenarios and others like them play out over three thousand times per year in the United States. Folks heading outdoors in search of adventure don't plan on getting lost or hurt in the wilderness. It can happen to the best of us, and when it does, people underestimate the challenges of the wilderness and overestimate their own ability.
To help you avoid becoming a statistic by rightly explaining the dangers of the wilderness and ensuring that you are physically and mentally prepared for any snags during your adventures, we've put together this wilderness survival guide.
- Stay Found – Make Survival Training a Waste of Time
- Fear the Weather – Wilderness Enemy Number One
- Communication – It's Not Just For Married People
- Buddy Up – One Is The Loneliest Number
- Survival Kit – The New Ten Essentials, Plus...
- Survival Priorities – Remember The Rule of 3
Stay Found – Make Survival Training a Waste of Time
You don’t want to end up on the six o’clock news. You don’t want to experience the escalating confusion that becomes genuine fear as you realize you’re lost. You don’t want to need you survival training.
In the wilderness, feeling lost releases adrenaline and provokes the classic fight or flight response. This is accompanied by many of the symptoms of a panic attack:
- Shortness of breath or hyperventilation.
- Heart palpitations or a racing heart.
- Chest pain or discomfort.
- Trembling or shaking.
- Choking feeling.
- Feeling unreal or detached from your surroundings.
- Sweating.
- Nausea or upset stomach.
The difference is that in a panic attack, there is no real harm or threat, but if you are lost in the woods, the danger is real and significant. Bad decisions made at this time can lead to injury, hypothermia, heat stroke, dehydration and death.
Prevent this by staying found – know where you are at all times.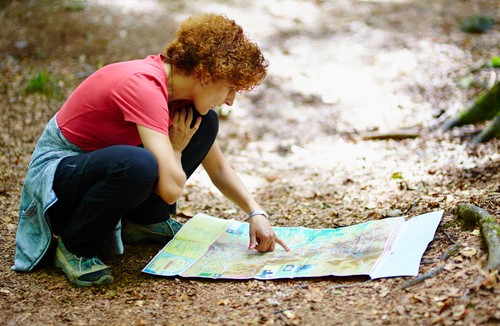
- Keep a topographic map of your area readily available.
- Refer to it constantly.
- Continuously match up features around you with points on the map.
- Take note of when you are able to pinpoint your position exactly – stream crossing, switch back, etc.
- Learn and apply a rough idea of your trail pace.
- Look forward along your trail and set expectations for arriving at chosen landmarks.
- If the landmark is not reached within a reasonable time, stop and reassess.
- Use your trail speed to get a better idea of your general location.
The best survival situation is the one that never happens. Keep track of your position during your entire time in the wilderness, and you will have one less thing to worry about if there are other challenges such as bad weather or an injury.
A GPS unit is only valuable if you know how to use it. Confirm your position on the map, plot waypoints, follow bearings, and monitor your distance traveled. If you only switch on the device when you feel lost, you still won’t know where you are, where you were, or where you should go. A GPS unit may embolden a user with a false sense of security that leads to even greater danger.
Fear the Weather – Wilderness Enemy Number One
Unexpected nasty weather in the mountains can turn a pleasant day hike into a life or death situation for the unprepared and is a most dangerous foe. Fortunately, being prepared for the weather is often as simple as bringing the right clothing. The right clothing will keep you cool in the heat, warm in the cold, and dry during a storm.
You probably don’t need to be prepared for both sub-zero temperatures and triple-digits on the same excursion. Find out the weather forecast for the area to which you’re heading – expect it to be different from your house – and plan accordingly.
Start at the top:
- The right headgear – a hat with a full brim for sunny weather, or a stocking cap for cold weather.
- Sunglasses to ease eye strain.
- The right top – long-sleeved polyester is a great base-layer for hot and cold. Bring an extra jacket or wool shirt in case the temperature drops.
- The right bottom – avoid cotton, especially jeans if there is any risk for rain. Cotton does not insulate when wet and can rapidly lower your body temperature, bringing the risk of hypothermia.
- Rain gear – don’t leave home without it. It doesn’t have to be elaborate or expensive. A trash bag will work in a pinch.
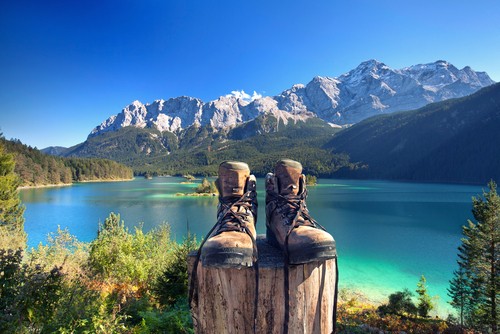
- The right footwear – protect your feet from the specific hazards you’ll face, and bring an extra pair of wool socks.
The bare minimum extra clothing can make a big difference in your experience if the weather turns sour. Take a few moments to add the gear to your pack. You’ll be glad you did if you need it, and glad you didn’t if the weather stays nice.
Communication – It's Not Just For Married People
The less time that a person spends lost, the less the experience will be a survival situation – this is a good thing. The best way to reduce the amount of time between a misadventure in the wilderness and getting the necessary help is to communicate your plans to family or friends before you go.
Create a Trip Plan and share it with them:
- Where are you going? Which route are you taking? Will the return route be different?
- When are you going? When do you expect to return?
- Who is going on the trip? What are their phone numbers?
- What will you be doing: Climbing? Canoeing? Dirt-biking? Snowshoeing? Horseback riding? Hunting?
Be sure to tell your friends and family when you’ve safely returned. If they don’t hear from you, they can try to contact you, and if that fails, start the process of Search and Rescue. Remember, the goal is not to have a crazy story of eating squirrels and drinking your own urine just to survive. If that’s your idea of fun, pursue those experiences directly. You do not want an emergency to force you to take those measures.
Buddy Up – One Is The Loneliest Number
Robert Koester is the search-and-rescue incident commander for the Virginia Department of Emergency Management, creator of the International Search and Rescue database and author of the book Lost Person Behavior. According to the data he has collected and processed, solo hikers account for 58% of all lost hikers, yet solo hikers are only a small percentage of all hikers, making the statistic that much more impressive.
Being male is also a risk factor. 40% of all lost hikers are solo males between the ages of 20 and 50.
You’re more likely to get lost if you go out alone. Dudes – find a friend and stay found.
Survival Kit – The New Ten Essentials, Plus...
So far we’ve spent the bulk of this guide explaining how to avoid a survival situation. Benjamin Franklin said, “An ounce of prevention is worth a pound of cure.” If, despite your best efforts at prevention, you find yourself stranded or injured or lost, you’re going to want some cure.
The Boy Scouts of America includes a list in their handbook called the “Ten Essentials.” We’ve borrowed their list, expanded upon it, and rearranged it. The items are organized by priority, based on how quickly they will need to be used if a survival situation develops.
- Map, and Compass – You must always know where you are. Practice staying found.
- Mobile Phone – Anti-climactic, isn’t it? You don’t want your experience made into a movie, I promise.
- Whistle – Louder and more effective than yelling, three blasts means “Emergency!” Use if separated from your group, or to attract the attention of any other nearby adventurers. It can also be used to hail the Search and Rescue group as they approach.
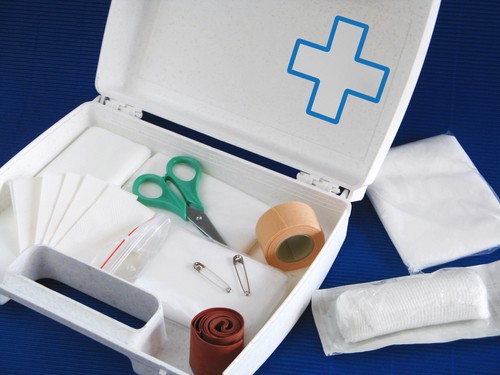
- First-Aid Kit – Avoid bleeding to death. Use a quart sized self-sealing plastic bag for the bare minimum.
- 6 adhesive bandages (2 large and 4 small)
- 2 sterile gauze pads, 3-by-3 inch
- 1 gauze roll, 3 inch by 4 yard
- 1 roll adhesive tape
- 1 triangular bandage
- 1 tube antiseptic ointment
- Bonus: moleskin to prevent blisters; ibuprofen or acetaminophen for pain relief
- Rain Gear – A cool rain shower with wind can be enough to cause hypothermia. Stop it before it starts.
- Extra clothing – In the event that you need an extra layer or replacement for wet clothes.
- Matches and fire starters – “Two is one, one is none.” Carry waterproof matches AND a lighter AND a magnesium fire starter. Dryer lint or toilet paper work as tinder, and a candle can hold a flame.
- Water bottle – do your best to limit sweating in a survival situation, but replenish as necessary.
- Multi-Tool – Wear it on your hip. Cut your bandages, scrape your magnesium fire starter, build a shelter, carve a spear, fend off wild attackers.
- Extras – The following items are important, but are listed as extras because they only serve to support the highest priorities of getting found and preventing blood loss, hypothermia or dehydration.
- Toilet paper – Never before seen on any survival kit list until now. You’ll need it within 24 hours. Keep it in a self-sealing plastic bag.
- Signal mirror – An additional method for attracting attention that can reach farther than your whistle and works when your mobile phone doesn’t.
- Sun protection – Sunburn is an injury. Don’t stress your body needlessly.
- Parachute cord – Lash your shelter together, set up a snare, make a cool bracelet.
- Flashlight – Don’t use it to travel at night. A headlamp allows hands free illumination if you waited too long to build your shelter or start your fire.
- Duct Tape – Wrap a length around the outside of your waterproof matches tube. Uses limited only by your imagination.
- Garbage bag – Doubles as a poncho or ground cloth.
- Trail food – You can live three weeks without food. Bring enough to keep the edge off.
Survival kit lists can be, and often are, customized for the individual. Some kits are separated into their own bag which can stand alone for a short adventure, or be tacked onto a bigger gear pile for an extended excursion. The idea is not to have a collection of cool expensive gear, but the equivalent of a fire extinguisher that is only used in an emergency.
Survival Priorities – Remember The Rule of 3
- You will die in 3 minutes without air.
- You will die in 3 hours without warmth or shelter.
- You will die in 3 days without water.
- You will die in 3 weeks without food.
#1 – STAY CALM
Your mind is your best tool and your most important resource in a survival situation. All the knowledge and equipment in the world won’t save you if you’re panicking.
It is natural to experience feelings that transition from confusion to fear when you realize that you’re lost or stranded. It is important to accept the situation and prevent these natural emotions from taking over your ability to think and make decisions.
Toward that end, there are some concrete physical steps that you can take to stay calm, regain your logic, and make wise life-saving decisions.
#2 – S.T.O.P.
 STOP is an acrostic to help you remember the basic steps of how to respond should you ever become lost in the woods. The guidance of STOP is also useful when stranded or injured. The whole process is designed to prevent rash mistakes that make the situation worse.
- S is variously interpreted to mean “Stop,” “Sit Down,” or “Stay Put.” Whichever one you remember will be helpful. As soon as you feel lost, quit moving. Don’t walk or ride or glide just a little bit farther in the hopes of finding a clue to your whereabouts. Each delay only postpones the inevitable. Don’t go any farther – just stop!
- T is for Think. Stay stopped while you think. Take the time to study your map and look for landmarks that provide clues to your location. Look back along the trail you’ve been taking – are there any signs or obvious clues? Try to remember the last point at which you were 100% certain of your location. Which direction have you been traveling since then? Make note of the time. How many hours until dark? Is the sun in the direction you expect it to be? Don’t strike out just yet; complete this process.
- O is for Observe. Assess the current situation. Are there additional issues that need to be addressed: blisters; first aid; thirst; over heating or sunburn; cold temperatures? Are the weather conditions changing? Is there a good place for shelter nearby? Are you near a water source? What supplies and equipment do you have that can help? Stay put while you think and observe.
- P is for Plan. Stopping to think and observe helps to keep you calm for planning a course of action. Is there enough daylight to get going again, or should you build a shelter for the night? Will you move out in the morning, or wait in place for help? Don’t feel rushed to get out of the woods – the pressure will not help you make a good decision.
#3 – FIRST AID
Treat life-threatening injuries immediately. Prevent the situation from worsening. Stop any bleeding, splint any broken bones, and make a plan to obtain more advanced care if necessary.
You should also be prepared to render first aid for the following situations:
- Hypothermia – when the body loses more heat than it can generate. Warm the victim internally with warm liquids, and replace wet clothing with dry clothing. Body heat from another person can aid in rewarming.
- Frostbite – localized tissue freezing, i.e. toes, fingers, nose, cheeks, or ears. Frozen parts should be rewarmed slowly with body heat or lukewarm water. Never rub or use friction.
- Dehydration – when the body gives off more water than is taken in. Drink enough water so that urine is lightly colored, even on cold days.
- Heat Exhaustion – when the body is barely able to maintain sufficient cooling on a hot day, and then only at the expense of other body functions. The victim should move to a cooler place out of the sun, eliminate exertion, and drink cool water.
- Heat Stroke – when the body has been unable to provide sufficient cooling for an extended period – the core temperature will be above 105 degrees F. The body temperature must be lowered quickly and hydration restored.
- Sunburn – when the UV protecting ability of the skin has been exceeded. There will be pain and swelling, possibly blisters. Prevention is the best method to protect against sunburn. Use sunscreen, a sun hat, and loose clothing that covers arms and legs.
- Minor Injuries – Cuts and scrapes can become infected, and should be cleaned. They may heal in the open or be protected by bandages. The best treatment for serious bleeding is direct pressure.
- Blisters – when the skin has been subject to excessive friction, it bubbles up. Hot spots give warning, and should be treated right away with moleskin. Once a blister has formed, protect it with a bandage.
- Bites and Stings – insect bites and stings cause a range of symptoms from mild irritation to anaphylactic shock. Know the local varieties and best methods for prevention and treatment. The same is true for snake bites.
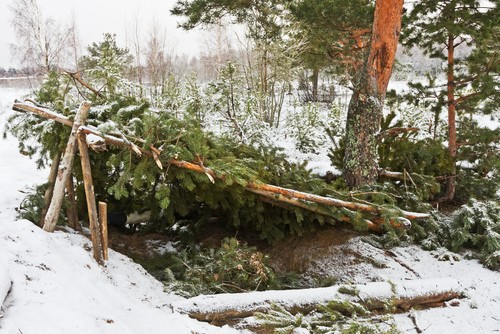
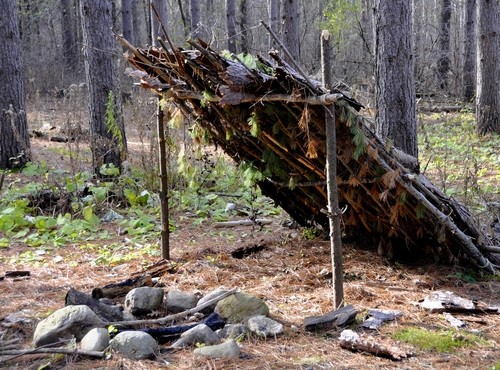
#4 – SHELTER
Extreme weather can kill in as little as three hours because the human body can only adapt to a narrow range of temperatures. We extend the survival range first with clothing.
Clothing protects from cold temperatures best when it is dry. Prevent your clothing from getting wet by using rain gear, taking shelter during a storm, or even using a plastic trash bag if necessary. Wear clothing in layers so you can adjust to changing weather with more precision.
We extend the range of temperatures we can survive even farther with shelter. A good shelter will block the wind, protect from precipitation, and add some insulation to conserve heat.
The guidance from S.T.O.P. applies in shelter building. Stop, Think, Observe, and Plan. Take inventory of the available materials, and develop a plan to build a shelter with minimal exertion for maximum effectiveness.
- Locate the right site
- Avoid hazards from avalanche, flood, lightning, high winds, and drifting sand or snow.
- Take advantage of natural shelters – caves, overhangs, fallen logs, large rocks, etc.
- Try to build where natural materials are abundant and limit your exertion.
- Proximity to water is an advantage, but may have risks and is not critical.
- Build your shelter.
- Build the smallest shelter that is adequate for your needs.
- A lean-to configuration is simple and effective.
- Protect your body from heat loss through the ground by insulating the floor of your shelter.
- Snow shelters. Snow can insulate you from the cold and block the wind.
- Tree pit – The area beneath the branches of a large evergreen tree forms a natural shelter.
- Snow pit – In deep enough snow, dig a long narrow pit. Be sure to insulate the bottom.
- Snow cave – Best protection, but most difficult to build.
- Be sure to mark your shelter location so that it can be easily found by Search and Rescue.
#5 – FIRE
In chilly and cold weather, a fire can be important for maintaining body warmth, melting snow for water, drying out clothing, signaling for help, and raising your spirits.
Fire is so important that you should practice starting fires in non-emergency situations – don’t try to learn when it’s critical for survival. Of course matches and lighters are simplest and most effective, but you should know how to start a fire using other methods as well.
All fires need fuel, heat and oxygen to support the ongoing chemical reaction of combustion. You can’t start a fire by holding a lighter under a log because the ratio of heat to fuel surface area is too small. Rather than carry a blowtorch, reduce the size of the fuel.
You’ll need fuel in three sizes to start a fire in the woods: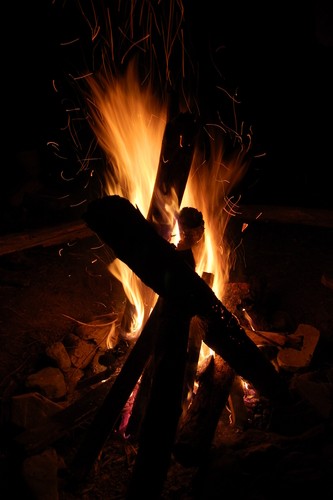
- Tinder – fine, dry material that will burst into flame at the touch of a match. Pine needles, dryer lint, and wood shavings are good examples. You’ll need a double handful.
- Kindling – material that will burn with a little encouragement, for example, twigs the size of a pencil. You’ll need a small armload.
- Fuel – full size wood that will keep the fire going once it’s started. This wood is smaller than you think – it should be no bigger than your forearm and must be as dry as possible. Gather four times as much as you think you need.
Only after all of your fuel is gathered should you make the fire lay and start the fire. As in so many things, the extra time spent in preparation will make all the difference in the final outcome. Rush the process and you will struggle for a long time.
Make the fire lay:
- Place your tinder in the center of your fire site.
- Place your kindling around the tinder in the form of a tepee. Allow for air circulation.
- Place your smaller fuel around the kindling in the same tepee formation. Leave an opening on the side from which the wind is blowing so that the air will push the flames toward more fuel.
When the fire lay is complete and you have a large supply of additional kindling and wood on hand, you can ignite the tinder. Flame sources can be mundane (highly recommended!), difficult, or exotic.
- Flick that Bic! – Kept warm and dry in your pocket, a lighter is small and effective. The flame persists allowing you to keep adding heat to more stubborn tinder, if necessary. Don’t leave home without it!
- Matches – Classic and effective, matches can be waterproof and kept in a waterproof container. Their flames may be short-lived, so extend burn time by transferring the flame to a birthday candle.
- Magnifying glass – This method is more difficult than you might expect and requires certain favorable conditions. Do not overestimate your abilities.
- Flint and steel – There’s a reason we start fires with matches and lighters today – they are effective and reliable. Flint and steel can be that as well, but it takes practice. Magnesium fire starters, a type of flint and steel, can be useful for damp fuels due to the high burn temperature of the magnesium shavings.
- Fire by friction – This is the classic method of using a bow and spindle to start a fire, and is very satisfying if you can do it. Practice at home before you head out, and you may be glad you did.
- Chocolate and Soda – Polish the bottom of a soda can with the very fine abrasive of chocolate (or toothpaste) until it is shiny as a mirror. The parabolic shape will catch and concentrate the sun’s rays enough to ignite dry tinder. Don’t eat the chocolate, as it will be full of aluminum dust, a known health risk.
#6 – WATER
Three days is the longest you will live without water, and it can be even less with greater exertion or higher temperatures. Dehydration is a serious problem, and can also happen on cold days. If you venture into the wilderness, you should always carry plenty of water. It’s a good idea to also bring some way to replenish your supply – a method for treating the water you find in nature so that it is safe to drink.
Methods for Treating Water: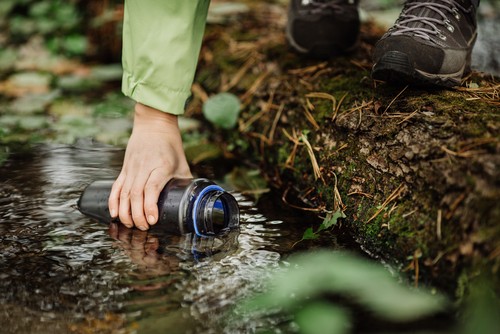
- Boiling – This is the surest way to make your water safe. Just bring the water to a full boil.
- Chemicals – Tablets containing iodine or chlorine kill bacteria and protozoa, and neutralize viruses. They affect the taste and take an hour to work, but they’re light and small and effective.
- Filtering – Most filters designed for backcountry use are hand operated pumps that force water through a screen with pores so small that bacteria and protozoa cannot get through. They don’t weigh much or take up much space, but they can be expensive. They are intended for use on extended trips, rather than for single emergencies. The LifeStraw, however, is designed for survival use.
If you have no ability to treat water, and are faced with dehydration, it is better to drink than die. Allow muddy water to stand until the silt settles to the bottom. Then use your t-shirt to strain out any remaining debris. Be alert to places where water may have collected, and prepare for outdoor adventures by learning other methods to obtain water.
A note regarding food: being hungry is unpleasant, but is also low on the list of survival priorities. It is more important to regulate your body temperature, find shelter, drink enough water, and signal your location to Search and Rescue.
Do not waste your time and energy looking for edible plants, setting a snare for a squirrel or fashioning a spear for a fish. Many plants are dangerous, making the risks outweigh the benefits, and effort spent hunting and preparing an animal for food would be better spent improving your shelter or gathering water. Pack an extra granola bar or hunk of jerky.
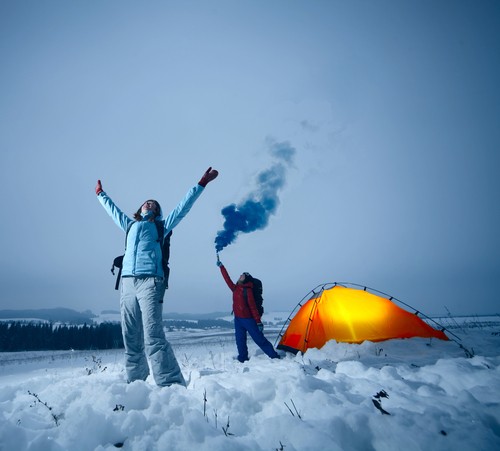
#7 – SIGNAL
Signaling for help is low on the list of priorities for survival, yet should be employed immediately and frequently during an emergency situation. Consider these methods for attracting attention and getting help:
 Cell phone – If you are within range of a cell tower, you can call 911 for emergency help. If signal strength is too weak for that, even the process of trying to call or send a text may leave an electronic “breadcrumb” that can help Search and Rescue triangulate your position.
- Whistle – Blow three sharp blasts when you cannot find yourself on your map. Blow three sharp blasts while you construct your shelter. Blow three sharp blasts as you gather wood for your fire, and three more as you start it. The repeating pattern of three is a distress signal and may attract attention of passersby you didn’t even know were near.
- Lights and reflectors – Use a signal mirror if you have one, or improvise with anything else reflective during the daylight. At night, use a flashlight to send groups of three flashes in the direction you believe rescuers might be able to see them.
- Color and motion – Draw attention to your location with bright colored clothing or camping gear. Hang them where a breeze can move them. Attach your shirt to a pole and wave it like a flag.
- Smoke and fire – Having already started a fire for warmth, the light at night and smoke during the day may broadcast your location. Experiment with ways to make the fire smoky without putting it out. Add damp leaves or green vegetation. Start second and third fires about 100 yards away from each other in a large triangle – a group of three is a distress signal.
Once you have attracted attention, it won’t be long before a rescue response is set in motion. Learn basic air to ground signals before you go. For instance a large “V” means “Require Assistance,” and a large “X” means “Require Medical Assistance.”
Conclusion
Even the most experienced veteran of the outdoors can become lost, injured, or stranded. Make every effort to avoid a survival situation by knowing your location at all times, and coming to a S.T.O.P. as soon as you have any doubt.
Keep calm, and decide to act not on your feelings, but on your logical plan for survival. Focus on true survival priorities, and conserve your energy. 95% of all rescues are successful in less than two days, so your unexpected challenge should be quickly resolved.
If you remember nothing else, remember this: ALWAYS TELL SOMEONE WHERE YOU ARE GOING AND WHEN YOU WILL RETURN!